Sunday, June 27, 2010

Setting X3270 in Gentoo

A common way to access Mainframe is using a 3270 terminal emulator running on a PC. There are a lot of 3270 terminal emulators available for both Windows and Linux. x3270 is one such terminal emulator for Linux. The best thing is that it is open source and free as in "free beer". It is present in the official software repositories of major Linux distributions and can be easily installed.
To install it in Gentoo, emerge the package net-misc/suite3270.

emerge --verbose net-misc/suite3270

Unlike most other applications, it is a pure X application and therefore more work is needed to set it up correctly.
The most common error you will encounter at first run will be(If you run from terminal):

Warning: Cannot convert string "-*-helvetica-bold-r-normal--14-*-100-100-p-*-iso8859-1" to type FontStruct

And you will left with a very small application window. Please note that maximizing or resizing window will not work on x3270. If you try to increase the font size by going into Options --> Font, you will be greeted with one more error message.


Now click on the keyboard icon in the application window and you will land up with one more error message in the terminal.

Warning: Cannot convert string "-*-fixed-medium-r-semicondensed-*-12-*-*" to type FontStruct


As you can guess all the three error messages are related to Fonts. The first error message indicates that x3270 cannot find the helvetica 100 DPI font.
For Gentoo the above and other 100 DPI fonts can be installed by emerging the package media-fonts/font-adobe-100dpi

emerge --verbose media-fonts/font-adobe-100dpi

The second error Message indicates that the x3270 can't find the 3270 fonts that were installed with the package. A temporary and per session solution will be using xset to set the path correctly.

xset fp+ /usr/share/fonts/x3270/
xset fp rehash

You can check the current font paths searched by X server using

xset q

The output will be like:

Font Path:
built-ins,/usr/share/fonts/x3270/

Please note that font path shown above is for Gentoo and may differ per distribution. To permanently add x3270 fonts to X server font path, you will need to edit the xorg.conf file. The file will usually be present in /etc/X11/. Create the file if it doesn't exist already. For an existing file add the following line in the Files Section.

FontPath "/usr/share/fonts/x3270"

For a new file add the following section.

Section "Files"
FontPath "/usr/share/fonts/x3270"
EndSection

The third error message indicates that x3270 can't find the fixed-medium-r-semicondensed font of size * x 12.

In Gentoo you can install the above and various misc X fonts by emerging package media-fonts/font-misc-misc.

emerge --verbose media-fonts/font-misc-misc

After installing above fonts you have to restart your X server. This can be done by simply logging off and again logging on. Hopefully you will not find any other error messages related to fonts, if you do follow the same procedure as for x3270 fonts to add your installed fonts in X server font path.

I am always very lazy to read the documentation and therefore it took me one day to figure out how to copy and paste in x3270. Normal Ctrl-V does not work if you are pasting in a x3270 dialog box. You have to use middle mouse button to paste. x3270 automatically copies a text once you select it.

Reference:


Monday, July 27, 2009

TTY and PTS

tty is a Unix command that prints to standard output the name of the file connected to standard input. The name of the program comes from teletypewriter, abbreviated "TTY".

pts stands for pseudo terminal slave. A terminal (or console) is a keyboard/screen combination you sit and type at. Old UNIX boxes would have dozens of them hanging off the back, all connected with miles of cable. A pseudo terminal provides just the same facility only without the hardware. In other words, it's an xterm window or a konsole window, or whatever utility you use. They pop into life as you ask for them and get given sequential numbers: pts/0, then pts/1 and so on.

Saturday, October 20, 2007

Running Servlets on Windows XP

20/10/2007

In my last blog, I wrote about how to run servlets in Fedora. As most of us use Windows not Fedora, so it forced me to write on running servlets in Windows XP. For my surprise it is more simple and easy than Fedora. So let's start.....


1. We need two things for running servlets in Windows XP: Sun Java SDK of course and tomcat. If you don't have Sun Java SDK, download the latest from http://72.5.124.55/javase/downloads/index.jsp

Download tomcat6 Windows Service Installer package from http://tomcat.apache.org/download-60.cgi


2. Install Java SDK. Now we have to set the environment variables for Java else we have to type the whole path of java compiler and interpreter each time to compile and run any Java Program. For doing that

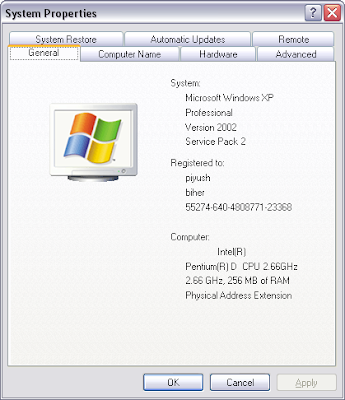
i. Go to Start -> Control Panel. If its not in Classical view then choose 'switch to Classical View'. Double click on System icon. Now you'll be seeing a System Properties dialog box similar to the following.


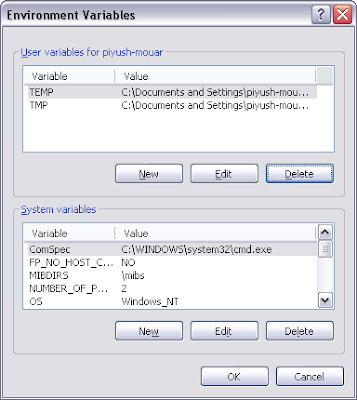
ii. Now click on Advanced tab, You will see a button named Environment Variables at the Bottom of it. Click on it and now you'll see a dialog box similar to the following.


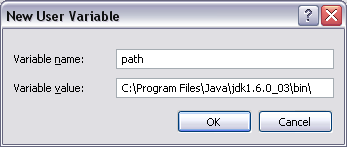
iii. On User variables, click on New. Now for Variable name enter 'path' and for Variable value enter the path of your JDK bin files directory. If you didn't change your default installation directory during installation it'll be something like 'C:\Program Files\Java\jdk1.6.0_03\bin\' where jdk1.6.0_03 will be replaced by your version of Java SDK. Click OK.


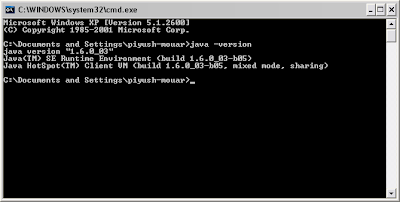
iv. Check that you correctly set the environment variable. Start -> Run. Type cmd. Now in Command Prompt type

java -version

It should give the output like this.


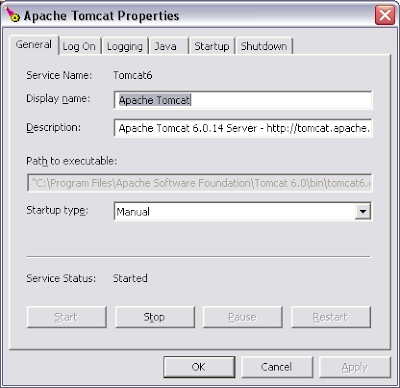
3. Install tomcat6. Start Tomcat by finding its start program in the Programs Menu (located in the Start menu). Look under Apache tomcat 6.0 and click Monitor Tomcat. In your notification area on taskbar Apache Tomcat icon will come. Double click on it and you'll see a dialog box. Start tomcat If it is not already started.


For more information on installation and setup tomcat visit the following links:

http://tomcat.apache.org/tomcat-6.0-doc/index.html
http://www.yorku.ca/jhuang/examples/tomcat-install.html (A little outdated though)


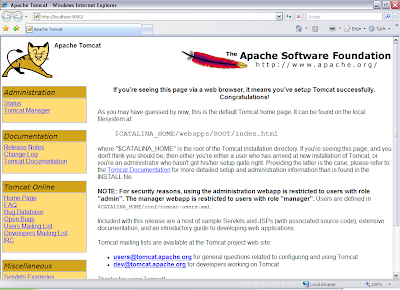
4. Check the tomcat installation by typing http://localhost:8080/ in your browser.


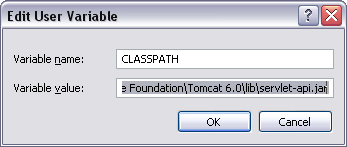
5. Now for compiling java servlets program you have to set the CLASSPATH environment variable to include the servlet-api.jar package path which will be 'C:\Program Files\Apache Software Foundation\Tomcat 6.0\lib\servlet-api.jar' for default installation directory. Change the path if you changed the installation directory. Now again set it using the same procedure for setting environment variables for Java. Remember to click on New button of User variables
not System variables.


6. Now we'll take a sample servlet program and will name it as MyHelloWorld.java

import java.io.*;
import java.text.*;
import java.util.*;
import javax.servlet.*;
import javax.servlet.http.*;
public class MyHelloWorld extends HttpServlet {
public void doGet(HttpServletRequest request,
HttpServletResponse response)
throws IOException, ServletException
{
response.setContentType("text/html");
PrintWriter out = response.getWriter();
out.println("<html>");
out.println("<body>");
out.println("<head>");
out.println("<title>Hello World!</title>");
out.println("</head>");
out.println("<body>");
out.println("<h1>Hello World!</h1>");
out.println("</body>");
out.println("</html>");
}
}

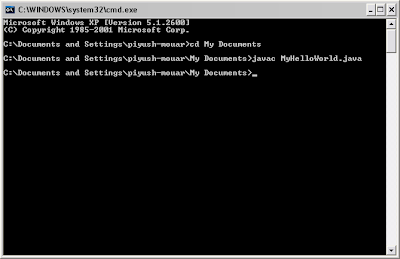
Save it using notepad as MyHelloWorld.java. Now compile it using javac command from the command prompt.


7. Now go to the tomcat installation directory. For default installation it would be C:\Program Files\Apache Software Foundation\Tomcat 6.0 here You will find webapp directory. Inside webapp directory make a directory named test. In this directory we will keep our web applications. Inside test, create directory WEB-INF. Inside WEB-INF create directory classes. Now inside classes we'll keep both our source and class files.


8. Copy the MyHelloWorld.java and MyHelloWorld.class files to the directory classes. Now to run our servlet we have to write our own web.xml file in the WEB-INF directory. Tomcat server reads the file web.xml to get information about the servlets. We'll open a file in notepad and copy and paste the following contents in the file. Save the file in the WEB-INF directory with the name web.xml

<web-app xmlns="http://java.sun.com/xml/ns/javaee"
xmlns:xsi="http://www.w3.org/2001/XMLSchema-instance"
xsi:schemaLocation="http://java.sun.com/xml/ns/javaee http://java.sun.com/xml/ns/javaee/web-app_2_5.xsd"
version="2.5">
<servlet>
<servlet-name>MyHelloWorld</servlet-name>
<servlet-class>MyHelloWorld</servlet-class>
</servlet>
<servlet-mapping>
<servlet-name>MyHelloWorld</servlet-name>
<url-pattern>/servlet/MyHelloWorld</url-pattern>
</servlet-mapping>
</web-app>

In the file the tags <servlet-name> and <servlet-class> gives the information about servlet-name and servlet-class and the tag <url-pattern> tells about the URL pattern to run the servlet.

9. Now stop and restart Tomcat from the icon in Taskbar. To run the sevlet type address
http://localhost:8080/test/servlet/MyHelloWorld


Thursday, October 18, 2007

Running Servlets on Fedora 7

18/10/2007

I was wondering for last two days to compile and run my java servlet programs on Fedora. But I couldn't find any useful information on internet. After much research and trial and errors I finally got to run servlets on Fedora. And this is how I did this, I think this might be useful for another novice like me. I have used the backward approach for this tutorial. It means problems first and then the solutions. Of course I could have used the straight approach like do this this and this and you are done. But I think that wont be much useful as you wouldn't know what thing is needed for what.


1. First thing first, before running servlets you need to compile them. And for that you need Sun Java SDK installed on your system. I'm assuming that you have it already on your system. If not you can go through this blog to find how to install it in Fedora.
http://mann-linuxproject.blogspot.com/2007/07/finally-jdk-is-installed.html


2. For compiling and running you also need tomcat installed on your system. You can choose Tomcat alone or with Apache. I preferred the second one. Install Apache by the command

yum install httpd

and install Tomcat on Fedora by the command

yum install tomcat5 tomcat5-webapps tomcat5-admin-webapps

here tomcat5 is the latest version for fedora.


3. Here is one sample program that I copied and pasted from a tutorial site. We'll use this sample program for our part of tutorial.

import java.io.*;
import java.text.*;
import java.util.*;
import javax.servlet.*;
import javax.servlet.http.*;

public class DemoServlet extends HttpServlet {

public void doGet(HttpServletRequest request,
HttpServletResponse response)
throws IOException, ServletException
{
response.setContentType("text/html");
PrintWriter out = response.getWriter();
out.println("<html>");
out.println("<body>");
out.println("<head>");
out.println("<title>Hello World!</title>");
out.println("</head>");
out.println("<body>");
out.println("<h1>Hello World!</h1>");
out.println("</body>");
out.println("</html>");
}
}


Type the program in a text editor and save the file as DemoServlet.java.

So like every java program, we'll use javac to compile the program.

javac DemoServlet.java

Even if you didn't did any typing mistakes, you are more likely to get the errors

DemoServlet.java:4: package javax.servlet does not exist
import javax.servlet.*;
^
DemoServlet.java:5: package javax.servlet.http does not exist
import javax.servlet.http.*;
^

If this is the case it means that our CLASSPATH environment is not set. Workaround for this problem is to
append the line
export CLASSPATH=/usr/share/java/servletapi5.jar
to your .bash_profile or .bashrc file. These files will be in your home directory and will be hidden.
Or one can alternatively type the above command each time he logins to compile servlet programs.

After adding the line you have to do a logout and login to reset the environment variables. Now again compile the program. Now it should not give the above errors and if you have typed the program correctly it'll compile successfully.


4. So we have compiled the program now how to run it. We can't just type java DemoSevlet to run the program here. Now we need Tomcat. login as root and make a directory in the tomcat web-application directory by the command

mkdir /var/lib/tomcat5/webapps/test

In this directory make another directory WEB-INF

mkdir /var/lib/tomcat5/webapps/test/WEB-INF

Inside this directory make directory classes

mkdir /var/lib/tomcat5/webapps/test/WEB-INF/classes

Inside classes directory we'll keep our servlet source and corresponding compiled class files. So copy the DemoServlet.java and DemoServlet.class files to this directory.

cp /path/to/DemoServlet.java /var/lib/tomcat5/webapps/test/WEB-INF/classes/
cp /path/to/DemoServlet.class /var/lib/tomcat5/webapps/test/WEB-INF/classes/

Replace /path/to with your own paths to DemoServlet.java and DemoServlet.class
Now in WEB-INF directory we'll create web.xml file which will give information about our servlets to Tomcat server.

While you are still logged as root go to the directory

cd /var/lib/tomcat5/webapps/test/WEB-INF/

Create the file web.xml using gedit

gedit web.xml

Now you should enter the following contents in the file and then save and quit.

<?xml version="1.0" encoding="ISO-8859-1"?>
<web-app xmlns="http://java.sun.com/xml/ns/j2ee"
xmlns:xsi="http://www.w3.org/2001/XMLSchema-instance"
xsi:schemaLocation="http://java.sun.com/xml/ns/j2ee http://java.sun.com/xml/ns/j2ee/web-app_2_4.xsd"
version="2.4">
<servlet>
<servlet-name>DemoServlet</servlet-name>
<servlet-class>DemoServlet</servlet-class>
</servlet>
<servlet-mapping>
<servlet-name>DemoServlet</servlet-name>
<url-pattern>/servlet/DemoServlet</url-pattern>
</servlet-mapping>
</web-app>

In the file the tags <servlet-name> and <servlet-class> gives the information about servlet-name and servlet-class and the tag <url-pattern> tells about the URL pattern to run the servlet.

5. Start the Apache server by command

service httpd start

Now test Apache Server by typing address http://localhost/ in your browser.


Start the Tomcat server

service tomcat5 start

Test Tomcat server by typing address http://localhost:8080/ in your browser


Run your servlet by typing address http://localhost:8080/test/servlet/DemoServlet in your browser.


Monday, July 16, 2007

Linux: Blocking a Website

16/07/07
I learned today how to block a website using iptables command. You just have to type the following

iptables -I INPUT -s -d 0/0 -j DROP

I blocked orkut by using

iptables -I INPUT -s www.orkut.com -d 0/0 -j DROP

It is recommended to use IP addresses instead of hostname. But I used hostname, so that my roommates have no difficulty in deleting the rule.

To know all the possible IP addresses of a website, use

host

Most of the times it'll give more than one addresses, so you have to define a rule for every IP address using the same syntax and it is highly recommended to use IP addresses than the hostname.
To delete the rule, the syntax is same. You have to only replace I with D

iptables -D INPUT -s -d 0/0 -j DROP

In my case I used

iptables -D INPUT -s www.orkut.com -d 0/0 -j DROP

I also edited my /etc/rc.d/rc.local file so that this rule will automatically load during boot time. I also edited one entry there. I deleted the line

echo 1 > /proc/sys/net/ipv4/ip_forward

This line was for enabling my computer to forward the ip packets from other computer to internet using my computer as gateway. So instead of setting the value of ip_forward by echo command, I
edited the Linux kernel config file: /etc/sysctl.conf
and set the following value

net.ipv4.ip_forward = 1

I searched a lot for iptables. There were many useful sites. The one that helped me most is
http://www.yolinux.com/TUTORIALS/

Wednesday, June 27, 2007

Fedora: Frontech TV Tuner Card Installation

13/06/07- I cannot install my TV tuner card in fedora (this problem is irrelevant to my project, but i want it to be solved)
Symptoms:
I am unable to use my frontech TV tuner card model number jil-0606. Fedora cannot recognize this card.
Causes:
Its a cheap card and manufacture didn't provide the sufficient information on its EEPROM. So fedora cannot recognize it automatically and hence driver is not loaded.


Solutions tried:

1. From internet and using the commands dmesg and Lspci -v, i was able to figure out that it is saa7130 chip based card. The thing to do here is to figure out the card type and tuner number by yourself and load the modules .
2. But in fedora there are 108 cards with different tuner number number. The last tuner number I tried was 71 and the list was more than 71 I think. So I sticked to card number 3 and tried different variations of tuner number from 1 to 71. I used modprobe saa7134 card=3 tuner=x command where x is the tuner number.
I used dmesg after each modprobe to see what system the tuner belongs. I used TvTime to check whether these settings are working. After checking each module, i had to unload them by rmmod saa7134 command, so that the next module can be loaded.
3. I got the TV signals on tuner number 6,22,24,35,42,49 and 60. When i reached 71 it hanged.
4. The TV broadcasting system in India uses PAL B standard. But unfortunately there was not any standard in the tuner like that it was PAL or PAL_BG. Unfortunately the tuners on which I got the TV signal was of varying standards. They were:
6 - Temic NTSC
22 - Temic PAL/SECAM multi
24 - Philips PAL/SECAM multi
35 - Temic PAL_DK/SECAM_2
42 - Philips 1236D ATSC/NTSC Dual
49 - Microtune 4042 FI5 ATSC/NTSC Dual in
60 - Thomson DTT 761X(ATSC/NTSC)
One thing to note here is PAL_DK is as much as different to PAL as PAL to NTSC. In all the cases i was able to get only picture but no sound from my card. Also I was not able to scan the channels because there was a message 'No Frequency' in TvTime. So i guess the card number is not correct as well as the tuner number.
So in last 'm again where i started from. The main problem is the card itself. It doesn't specify sufficient about it in its EEPROM.
Solution:
Problem solved on 27/06/07
Actually the problem was tvtime software, which just couldn't recognize my card for my thousands of attempts. It's really thousand attempts, I wasted too much time for trying different cards and tuners. I installed kdetv that comes with fedora 7. First i tried different cards from my chosen 37 cards ( I identified the cards that have the same input as my Frontech card ) and tuner number 5. In first attempt I got only one channel that can be barely seen. Then i tried the card=17 tuner=37 and I got four channels with good picture. Then from channel configuration of kdetv I chose manual channel selection, didn't touch the maximum and minimum frequency and set the interval for searching 1MHz and I got all the channels.


But now I was not getting any sound. I again searched the internet and found the answer. I changed the card
number to 3 and everything get solved. I added the line options saa7134 card=3 tuner=37 in /etc/modprobe.conf so that the module will be automatically loaded at the boot time.

Linux: Internet Sharing

12/06/07- Unable to share the internet connection between fedora and Windows xp systems
Symptoms:
1. Unable to connect from windows xp laptop to internet through fedora desktop system. The gateway for windows xp was set rightly it was 192.168.0.1. That is the ip address of fedora system.
Solution:
problem solved on 12/06/07
1. I did the following changes:
i went to /etc/sysconfig/network-scripts/ifcfg-eth0
it was something like:
# Realtek Semiconductor Co., Ltd. RTL-8139/8139C/8139C+
DEVICE=eth0
BOOTPROTO=none
HWADDR=00:16:76:87:37:37
ONBOOT=yes
TYPE=Ethernet
USERCTL=no
IPV6INIT=no
PEERDNS=yes
NETMASK=255.255.255.0
IPADDR=192.168.0.1
I added one line there to form a LAN
BROADCAST=192.168.0.255
It enabled fedora system to listen to all the systems in LAN.
2. I went to /etc/rc.d/rc.local
and added the following lines in the file
/sbin/iptables --flush
/sbin/iptables --table nat --flush
/sbin/iptables --delete-chain
/sbin/iptables --table nat --delete-chain
/sbin/iptables --table nat --append POSTROUTING --out-interface ppp0 -j MASQUERADE
/sbin/iptables --append FORWARD --in-interface eth0 -j ACCEPT
echo 1 > /proc/sys/net/ipv4/ip_forward
3. I opened windows system and changes the DNS Server address to those of my ISP TATA VSNL. Of course i didnt change the gateway address.
and its done my dear friend.
I'm very happy to solve this problem because the way i used to form a LAN i didnt found that help on net. there was a command /sbin/ifconfig eth0 192.168.0.1 netmask 255.255.255.0 broadcast 192.168.0.255 but you have to run it every time you boot or add it in /etc/rc.d/rc.local file. But i chose my own alternate option.
Second thing was we have to run the iptables command manually every time system boots. so i added them in /etc/rc.d/rc.local file. And it was also not easy u have to find the absolute path for the iptables command. Luckily fedora has all its commands in /sbin directory. So I finally set it up. And god I spent my six hours on it. Trying and failing trying and failing. But in last I succeeded.